Contents
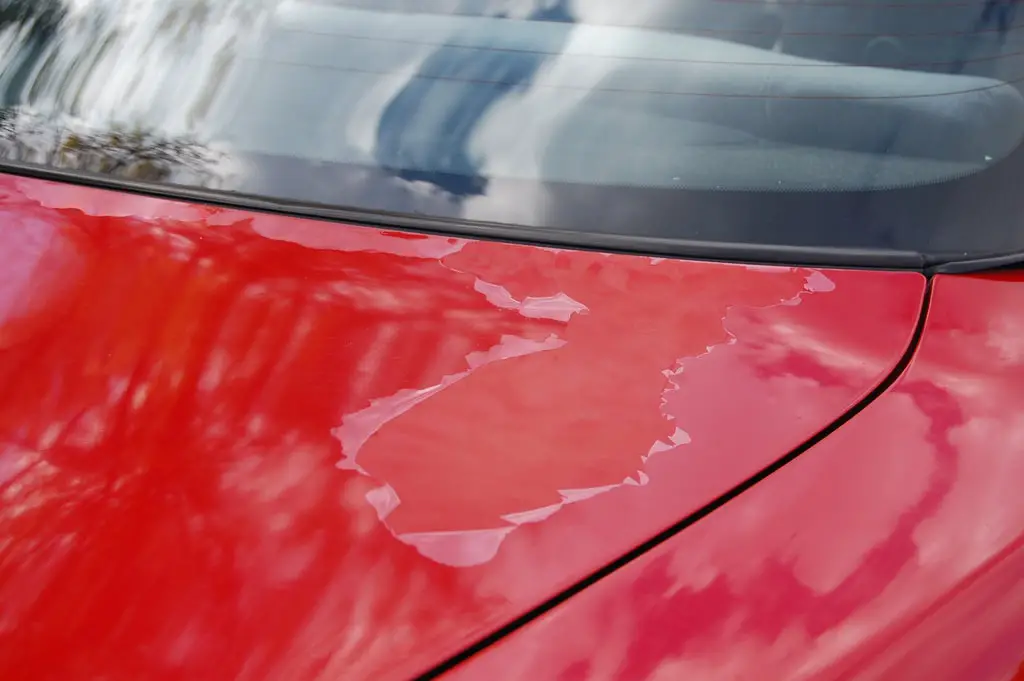
A clear coat allows your paint to better resist UV damage and makes it easier to clean, but it can also make your paint look dull. However, when you spot it on the headlights of your car, it can be difficult to tell how to remove the clear coat from the headlights.
There are a few ways to remove a clear coat from headlights. You can use all of them or maybe even one will help your case. We’ll go over the pros and cons of each method so you can decide which is best for you.
Can you use clear coat on headlights?
After sanding and polishing the headlights, it is best to apply two or three coats of clear coat. This will not only protect the headlights from future UV damage, but it will give the lenses unsurpassed clarity.
The only reason to use a clear coat on headlights is to keep them looking clear and new. However, not so many drivers use a clear coating on their headlights because they don’t know how to properly apply it. If you don’t know how to apply a clear coat or if you want to avoid the hassle, we recommend using a headlight restoration kit instead.
If you do choose to use clear coat on your headlights, make sure that you use a product that is specifically designed for automotive use. Many products that are marketed as “clear coat” are actually not meant for automotive use and can actually damage your headlights. To apply clear coat to your headlights, first clean the lenses with a quality headlight cleaner. Once the lenses are clean, apply two or three thin coats of clear coat, allowing each coat to dry thoroughly before applying the next.
If you are not planning on doing any further work on the headlights, then you can skip the clear coat step. Keep in mind, however, that without the clear coat, the headlights will eventually become dull and yellowed from exposure to UV rays.
How do you remove clear coat from headlights?
The reasons for you wanting to remove the clear coat from your headlights may vary. You could be wanting to do a full restoration on your car, or you might just want to clean them up a bit so they aren’t as yellowed and dull.
There are a few different ways that you can go about removing the clear coat from your headlights. You can use a chemical stripper, sandpaper, or even a power washer. Here we will give you only general guides and recommendations and all the potholes would be reviewed later.
If you decide to use a chemical stripper, make sure that you use one that is specifically made for removing a clear coat. Apply the stripper to the headlight, and then let it sit for the amount of time specified on the product label. After the specified time has passed, use a clean cloth to wipe away the stripper and the clear coat.
In case you decide to use sandpaper, you will need to start with coarse grit and then work your way up to a finer grit. Start by sanding down the entire headlight, and then move on to sanding only the areas where the clear coat is peeling or flaking off. Once you have sanded down the headlight, use a clean cloth to wipe away any dust or debris.
On the occasion that you decide to use a power washer, be sure to use a low-pressure setting. Start by holding the power washer nozzle about a foot away from the headlight. Slowly move the power washer back and forth across the headlight until all of the clear coat has been removed.
How do you remove clear coat without sanding?
Only use paint thinner to remove your clear coat surface in case you no longer want that paint job. Some car owners might recommend you try mineral spirits instead for safe removal and use fine grit sandpaper to rub away any blemished clear coat areas. You can also buff out the clear coat with a polishing compound.
So, if you’re planning on redoing your headlights, then you’ll need to remove the old clear coat first. This can be done using several methods, including sanding, painting thinners, and polishing compounds. Whichever method you choose, make sure to take care not to damage the underlying headlight material.
One way to remove a clear coat is to use paint thinners. This will dissolve the top layer of the finish without harming the headlight material underneath. You can then use fine-grit sandpaper to lightly sand away any remaining clear coat and prep the surface for a new finish. Another method is to use a polishing compound. This will buff out the top layer of the finish without causing any damage. Once you’ve removed the old clear coat, you can then apply a new one.
Whichever method you choose, make sure to take your time and be careful not to damage the underlying headlight material. With a little patience, you’ll be able to remove the old clear coat and prepare the surface for a new finish.
How do you remove Rustoleum clear coat from headlights?
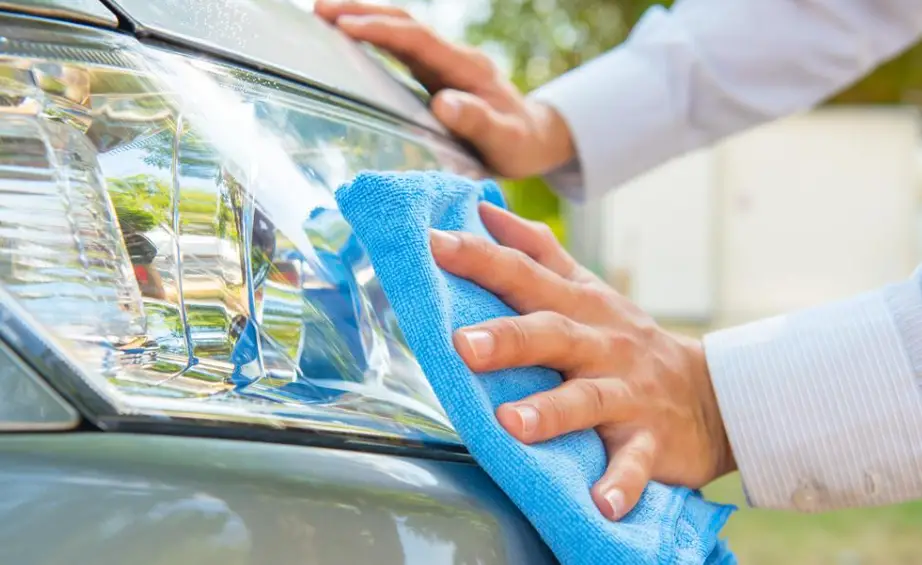
Apply plastic lens cleaner and polish to the headlights, using a clean cotton towel. Work the cleaner in small circles and cover the entire headlight. Repeat this step on each headlight several times for the best results and Rustoleum removal. The headlight should look more clear as each coat is applied and worked into the surface. Wet a clean cotton towel with rubbing alcohol and wipe over the headlight. This will remove any cleaner residue and leave the surface clean for the next step.
Does acetone remove clear coat?
As acetone removes wax and can eat through clear coats, most experts do not recommend its use on car paint. The majority of car owners use it to remove stubborn stains or to clean paint that has been painted over.
If you must use acetone, always test it on an inconspicuous area of the car first to make sure it does not damage the paint. Apply a small amount of acetone to a clean cloth and rub it over the area in question. If the cloth begins to disintegrate or the paint changes color, do not use acetone on that spot.
Otherwise, dip a new cloth in acetone and apply it to the stain or area you wish to clean. Rub the cloth in a circular motion until the desired results are achieved. Once you have removed the clear coat, wash the area with soap and water to remove any residue. Dry it off with a clean towel and inspect for any damage. If there is damage, you may need to repaint the area.
Can I use paint thinner to remove clear coat?
You should never use paint thinner on clear surfaces. It may remove the clear coat with a few applications, but it might remove the paint underneath as well. Do not use paint thinner on the clear coat surface that may interfere with the removal of that paint job if you don’t wish to.
Paint thinner works in such a way that it will eat away at the paint, and it will do so with great speed. If you use paint thinner on your headlights, you will likely find that the headlight’s clarity is greatly reduced. In some cases, the entire headlight may become cloudy.
Will nail polish remover remove clear coat?
No matter what nail polish remover you use, it can dissolve the clear coat and paint on your car. It should therefore be classified as a harsh liquid, such as acetone or other liquids that are acetone and other liquids that are harsh on your car paint. If you use these chemicals to remove your clear coat, it will also remove the paint. The good news is that there are ways to safely and effectively remove the clear coat from your headlights without damaging the paint.
Nail polish is a very aggressive solvent and will remove the clear coat and paint from your car. It is important to use a product that is designed for removing nail polish, such as acetone, to avoid damaging the paint on your car. Moreover, nail polish and headlights are two completely different things. One is meant to be applied to the nails and the other is not. Applying nail polish to your headlights will damage them and cause them to become dull and yellowed over time.
Will rubbing compound remove clear coat?
Both compounds can fix scratches by removing a thin layer of the clear coat.
Can you sand off clear coat?
You will want to try and have 400, 800, 1,000, and 1,200 grit sandpaper. This is a good spread and will make clear coat removal that much more of a breeze. Be careful though any grit can potentially cause damage beyond the clear coat, but more on that later.
Soak the sandpaper in a bucket of water for about 30 minutes before starting. This will help to lubricate the paper and prevent it from gumming up too quickly. You might also want to add a little bit of dish soap to the water to help further with this process.
Start with the 400-grit paper and work in a circular motion. As you sand you will want to keep the paper wet, so make sure to dunk it back in the bucket frequently. You should start to see the clear coat coming off within a few minutes. If you find that the 400 grit isn’t doing the trick, move on up to 800 and then 1,000. By this point, you should have most of the clear coat removed.
For the final step, use the 1,200 grit paper to buff out any remaining clear coat and create a smooth surface.
Can you sand clear coat and respray?
You cannot just sand an adhesion and respray clear coat. Sand on a base and spray a coating of clear to coat it, but a new coat won’t adhere and will remain on top of a clear at the edges all the time. will not pass the same strength test as an original, and it will fail much sooner. As long as the top clear is there, the bottom won’t be able to breathe, and it will eventually turn yellow and dull.
Respraying may be an option if the entire headlight lens is sandblasted to remove the old clear coat. This can be done at a professional shop, or you can do it yourself with a sandblaster and some patience. Once the lens is completely stripped of its old coating, you can apply a new clear coat using an airbrush or spray gun.
Will Meguiars Ultimate Compound remove clear coat?
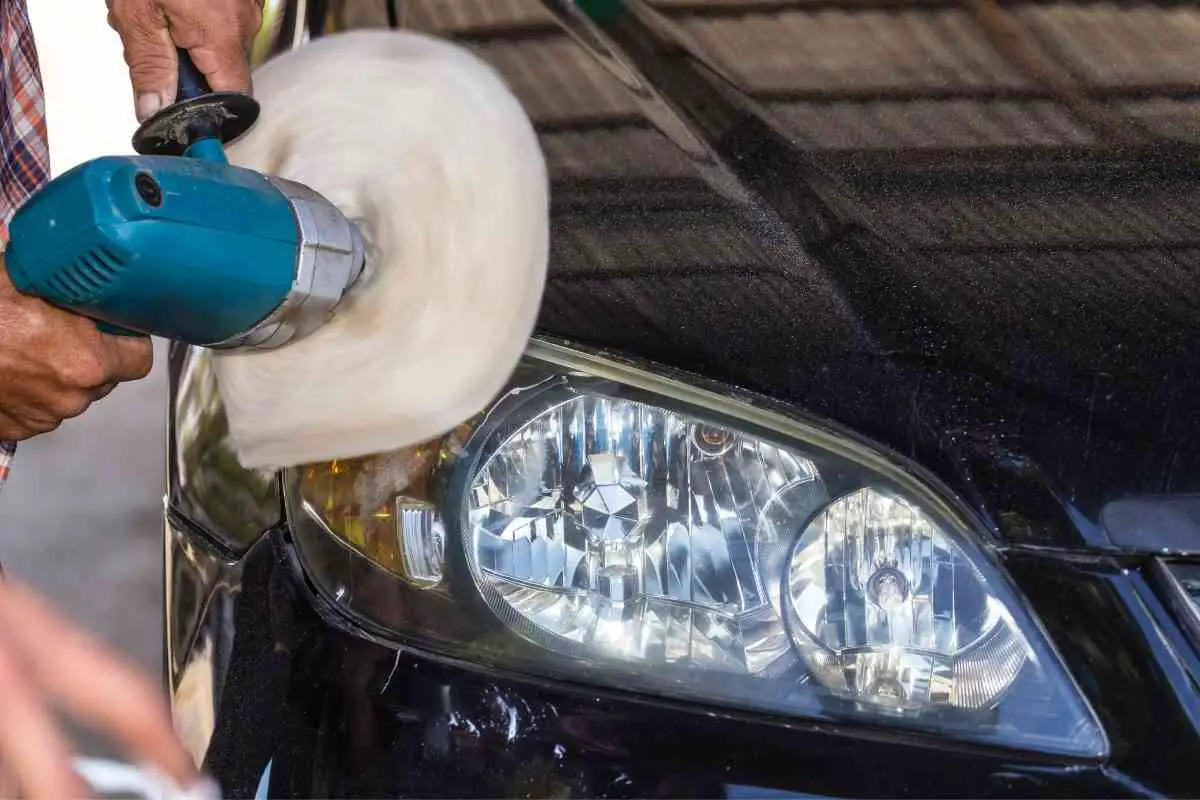
Whether you are working by hand, orbital or DA Polisher, swirls and scratches can be removed easily using a clear coat-safe “paint cleaner” like Meguiar’s Ultimate Compound. Never use harsh traditional style compounds, as they can damage/haze a modern clear coat finish.
To remove clear coat by hand:
- Wash and dry the vehicle. This will remove any loose dirt and grime that could scratch the paint during compounding.
- Start with a small amount of Ultimate Compound on a foam cutting pad. Work it into the clear coat in a small area using overlapping circular motions.
- Wipe away the compound with a clean microfiber towel. Inspect your work and repeat as necessary until all swirls and scratches are removed.
Meguiar’s Ultimate Compound work in such a way that it actually levels out the clear coat, filling in scratches as it polishes. This makes it the perfect product to use if your goal is to remove clear coat without damaging the paint underneath.
How do you get yellow clear coat off?
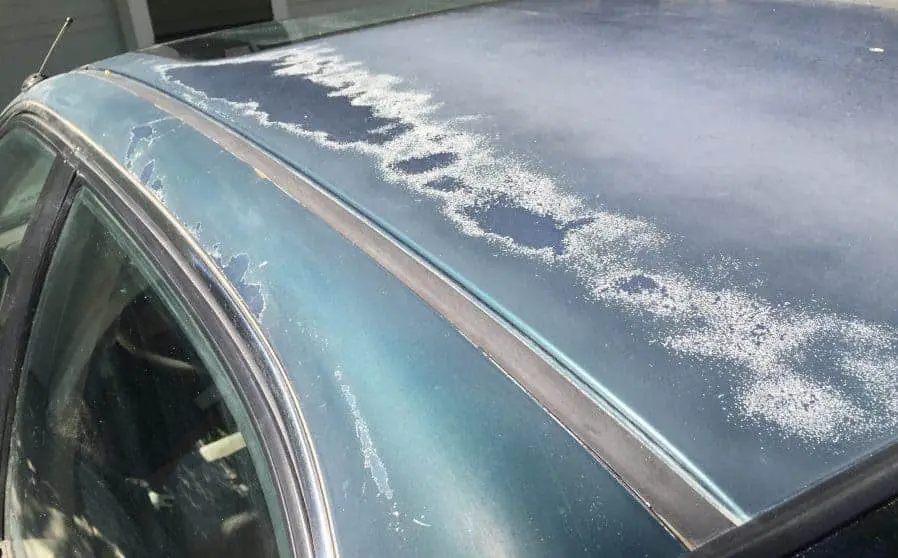
If your headlights are looking a little yellow and cloudy, it’s probably because of a build-up of a clear coat. As you already know, a clear coat is a type of paint protection that is applied over the top of your car’s paint job. It helps to protect the paint from UV rays, scratches, and other damage. Over time, though, the clear coat can become dull and yellowed. Luckily, it’s relatively easy to remove a clear coat from headlights.
To fix yellow polyurethane, you can scuff the top layer with ultra fine-grit sandpaper. 220-grit works fine. The sandpaper will help to remove the yellow tint and lighten the polyurethane finish. You should know that in most cases, using ultra-fine sandpaper to remove the yellow tint won’t work. Your headlights are probably oxidized, and the only way to remove the oxidation is to use a headlight restoration kit.
So, the yellow clear coat on your headlights may be removed only with a professional headlight restoration kit which you can find at any auto store. The kit will have all the necessary materials and instructions on how to remove the yellow clear coat from the headlights.
Does mineral spirits remove clear coat?
There is no harm to clear coats caused by mineral spirits, and they will remove just about anything from them. Meguiars sells clay bar solutions if that doesn’t work. If you are using a clay bar, be sure to avoid using it on a hot surface.
Your car`s headlights are one of the first places that dirt, grime, and other debris accumulate. Over time, this buildup can cause hazy, yellowed headlights that not only look bad but can also make it more difficult to see while driving at night.
There are mineral spirits that can be used to remove the clear coat from headlights. You can also use a clay bar to remove the clear coat. Be sure to avoid using it on a hot surface. Here is a short guideline:
Step 1. Take a look at your headlights to determine how bad the build-up is. If they are only slightly yellowed, you may be able to skip ahead to Step 3.
Step 2. Pour some mineral spirits onto a clean rag.
Step 3. Rub the rag over the surface of the headlight in a circular motion.
Step 4. Repeat steps 2-3 until the headlight is clear.
Step 5. Wash the headlight with soap and water to remove any residue from the mineral spirits.
Step 6. Dry the headlight with a clean towel.
So, mineral spirits can do the trick in removing the clear coat from headlights. But, be cautious while using it on a hot surface. Also, don’t forget to wash the headlight with soap and water to remove any residue from the mineral spirits.
Does wet sanding remove clear coat?
Wet sanding is used to remove severe clear coat scratches. It is the most effective of the three techniques at flattening the clear coat, but it’s also the riskiest. Wet sanding is an aggressive process that cuts away the clear coat quickly. At the same time, wet sanding is also the most likely to cause damage to the underlying plastic. This is why it’s so important to use very fine grit sandpaper and move slowly.
If you’re going to wet sand, you’ll need two things: water and sandpaper. Wet sanding paper is available in a variety of grits, from coarse (60 grit) to very fine (2000 grit). The coarser the paper, the more material it will remove, but it is also more likely to damage the plastic.
Wet sanding can be done by hand or with a machine. If you’re doing it by hand, soak the sandpaper in water for a few minutes before starting. This will help to keep the paper from drying out too quickly. If you’re using a machine, start with a low speed and gradually increase the speed as you go. Be sure to keep the sandpaper wet at all times; if it starts to dry out, it will clog up and become less effective.
Once you’ve finished wet sanding, wash the area with soap and water to remove any residue. Then, dry it off and inspect your work. If there are still scratches visible, you can try wet sanding again with finer grit paper. Otherwise, move on to polishing.
Conclusion
In order to remove clear coat from headlights, you may consider several methods. The least abrasive and most effective method would be to use a headlight restoration kit. These kits come with a variety of sandpaper grits that will remove the clear coat without damaging the underlying plastic.
If you do not have a headlight restoration kit, you can try using a rubbing compound or polishing compound. Apply the compound to a clean microfiber cloth and rub in a circular motion until the clear coat is removed. You can also use 0000 steel wool to remove the clear coat. Be sure to use light pressure as you don’t want to scratch the plastic underneath. Whichever method you choose, be sure to follow up with a headlight sealant to protect your headlights from future damage.

Headlights are automotive jewelry. Correct fitment coupled with the right choice of technology will turn your vehicle into a shining gem.
Official sources of fitment information – https://sylvania-automotive.com and https://www.automotivebulbfinder.com/philips/